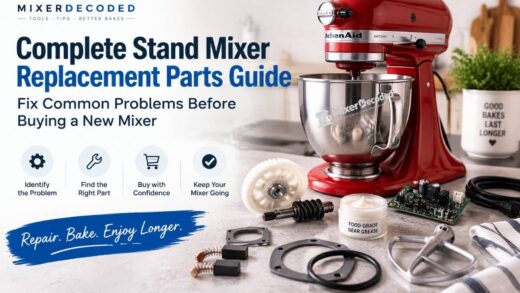
Stand mixer replacement parts can often restore a failing mixer without the cost of buying a completely new machine. Most stand mixers are built around a small number of wear components — including gears, motor brushes, seals, gaskets, control boards, and electrical parts — and identifying the failed component is usually the first step toward a successful repair.
This guide explains the most common stand mixer replacement parts, what symptoms they solve, how to identify the exact part you need, and how to avoid buying replacements that only look compatible but fail to perform correctly.
Whether your mixer is making grinding noises, losing power, leaking grease, or refusing to start, the correct replacement part often depends on your exact mixer model, generation, and the type of failure occurring.
Quick Answer: What Stand Mixer Parts Usually Need Replacement?
The most commonly replaced stand mixer parts fall into five categories: drive components, motor components, electrical controls, sealing parts, and planetary assemblies.
- Worm gear and drive gears — usually responsible for grinding noises, damaged drive systems, or a mixer that stops turning.
- Carbon motor brushes — common causes of weak power, intermittent operation, or stalling.
- Control boards and speed controls — electrical components responsible for speed regulation and power delivery.
- Seals, gaskets, and grease — commonly replaced when grease leaks from the transmission or planetary shaft.
- Planetary assemblies — replaced when the attachment hub movement becomes loose or damaged.
Most Common Stand Mixer Replacement Parts at a Glance
Identify the component most likely causing your mixer problem before ordering a replacement part.
Worm Gear
Commonly replaced when the mixer makes grinding noises, loses drive, or stops turning under load.
Motor Brushes
Worn carbon brushes can cause weak power, intermittent operation, or stalling during mixing.
Control Board
Electrical issues such as speed problems or failure to start may point to control components.
Seals & Gaskets
Used to address grease leaks around the transmission housing and attachment shaft.
Planetary Assembly
Helps restore proper attachment movement when the hub becomes loose or damaged.
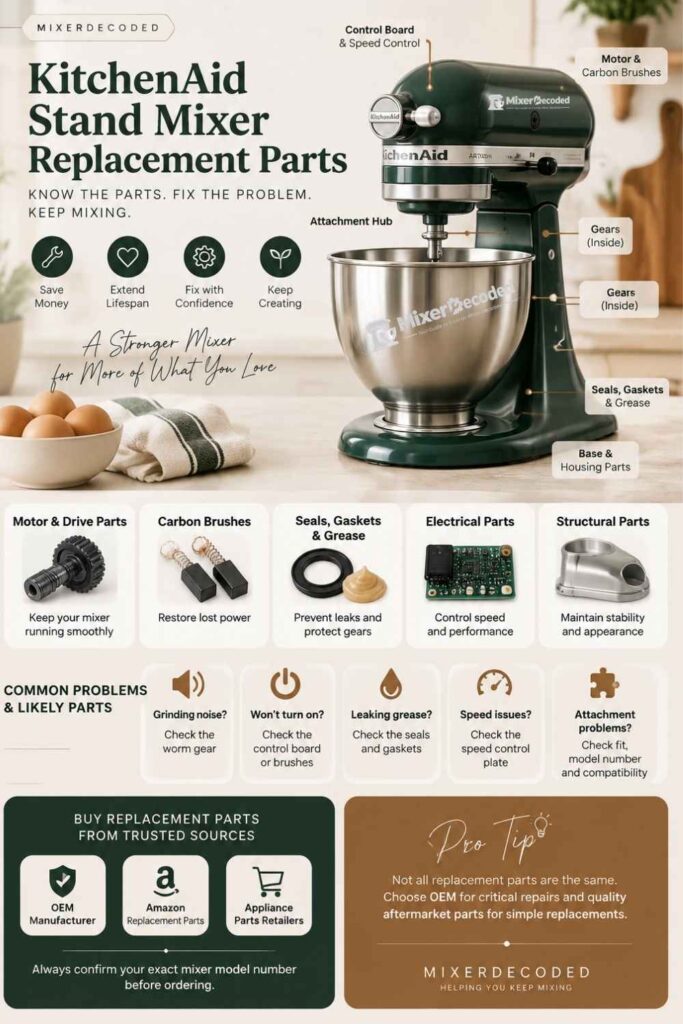
Use the guide below to quickly identify the most common stand mixer replacement parts, what problems they solve, and which components usually require attention before purchasing a new mixer.
In this article, we’ll cover:
Common Replacement Parts by Category
Stand Mixer Replacement Parts Anatomy
Most stand mixer failures can be traced to a few key mechanical, electrical, and maintenance components. Understanding these parts helps you identify the correct replacement before ordering.
Motor & Drive System
The drive system transfers power from the motor to the attachment hub.
- Worm gear
- Drive gears
- Planetary assembly
Motor Components
Electrical wear parts that affect power delivery and performance.
- Carbon motor brushes
- Motor components
Electrical Controls
Components responsible for controlling speed and power output.
- Speed control plate
- Control board
- Wiring components
Sealing System
Small components that prevent grease leaks and protect internal parts.
- Gaskets
- O-rings
- Gear grease
Structural Parts
External components commonly replaced during repairs or restoration.
- Bowl supports
- Pins
- Housing parts
Motor and Drive Replacement Parts
The drive system is responsible for transferring power from the motor to the attachment hub. These components experience significant stress during heavy mixing.
Stand Mixer Motor & Drive Parts Explained
The drive system transfers power from the motor to the attachment hub. When these components wear out, symptoms usually appear as grinding noises, loss of movement, or reduced mixing performance.
Worm Gear
A protective drive component designed to transfer power while reducing stress on the motor.
- Grinding or clicking noises
- Mixer stops turning
- Loss of drive power
Planetary Assembly
Controls the orbital movement of the attachment hub and helps maintain proper mixing action.
- Loose attachment movement
- Uneven mixing
- Attachment hub issues
Drive Components
Additional mechanical parts that help transfer motor power through the mixer head.
- Supports heavy mixing
- Transfers motor force
- Protects internal components
Worm Gear and Worm Follower Gear
The worm gear is one of the most frequently replaced stand mixer parts.
It is designed as a protective component that can fail before more expensive motor components are damaged.
Common symptoms include:
- Grinding or clicking noises
- Mixer motor running but attachment not turning
- Sudden loss of mixing power
- Mixer stopping under heavy dough loads
Planetary Gear Assembly
The planetary assembly controls the orbital movement of the attachment hub.
A damaged planetary assembly may cause:
- Excessive attachment movement
- Unusual noise during operation
- Poor mixing performance
- Loose attachment movement
Carbon Motor Brushes
Carbon brushes transfer electrical current to the motor.
Because they wear down over time, they are considered normal maintenance items.
Common symptoms include:
- Mixer starts and stops randomly
- Reduced motor power
- Stalling under load
- Intermittent operation
Carbon Motor Brushes: A Small Part That Affects Mixer Performance
Carbon brushes are wear components that transfer electrical power to the motor. When they become worn, your mixer may lose power, stall, or operate inconsistently.
Worn Motor Brushes
Over time, carbon brushes become shorter and may reduce the electrical connection needed for normal motor operation.
- Weak mixing power
- Intermittent operation
- Mixer stopping under load
Common Symptoms
Brush wear often appears gradually before complete motor failure occurs.
- Loss of speed
- Reduced torque
- Motor hesitation
Replacement Solution
Replacing worn carbon brushes can restore motor performance when the motor itself is still functional.
Check Motor Brushes →Motor Housing or Motor Assembly
A complete motor replacement is usually one of the more expensive repairs.
It is generally considered only after confirming that smaller components such as brushes, wiring, or control boards are functioning correctly.
Seals, Gaskets, and Grease Replacement Parts
Small sealing components play an important role in preventing lubricant leaks and protecting internal gears.
Seals, Gaskets & Grease: Small Parts That Prevent Big Problems
Sealing components protect the internal gear system by keeping lubricant contained and preventing contamination. When these parts wear out, grease leaks and performance issues can appear.
Gear Grease
Internal grease reduces friction between moving components and helps protect gears during operation.
- Reduces wear
- Protects moving parts
- Improves gear performance
O-Rings & Seals
Small sealing components prevent grease from escaping around the attachment shaft and internal areas.
- Grease leakage prevention
- Protects internal parts
- Maintains proper sealing
Transmission Gasket
A worn gasket can allow grease to escape from the transmission housing.
- Visible grease leaks
- Housing seal problems
- Maintenance replacement
Transmission Housing Gasket
The transmission gasket helps prevent grease from escaping from the gear case.
Signs it may need replacement:
- Grease leaking from the mixer head
- Visible lubricant around the housing
- Grease buildup near internal components
Planetary Shaft O-Ring
The planetary shaft O-ring is a small but important sealing component.
A worn O-ring can cause:
- Grease appearing around the attachment shaft
- Oil residue near the beater connection point
Gear Grease
When replacing gears, refreshing the internal grease is often recommended.
Old or insufficient grease can contribute to:
- Increased friction
- Excessive heat
- Premature gear wear
Electrical and Control Replacement Parts
Electrical failures can sometimes appear similar to motor problems, making proper diagnosis important.
Stand Mixer Electrical Parts Explained
Electrical components control how your mixer starts, changes speed, and delivers power to the motor. When these parts fail, the symptoms can appear similar, so proper diagnosis is important.
Control Board
The control board regulates electrical signals and helps manage mixer speed and operation.
- Mixer will not start
- Speed problems
- Unexpected stopping
Speed Control Plate
Controls how power is delivered to the motor during different mixing speeds.
- Incorrect speeds
- Speed fluctuations
- Power delivery issues
Power Cord & Wiring
Damaged wiring can interrupt electrical supply and create performance issues.
- No power
- Intermittent operation
- Visible damage
Speed Control Plate and Control Board
These components regulate motor speed and power delivery.
Possible symptoms:
- Mixer does not turn on
- Mixer runs at incorrect speeds
- Mixer loses power during operation
- Speed changes unexpectedly
Power Cord and Plug
A damaged power cord is often overlooked.
Before replacing major components, check:
- Cord damage
- Loose connections
- Plug condition
A simple electrical replacement may solve what appears to be a larger mixer failure.
Structural and Cosmetic Replacement Parts
Not every replacement part affects mixer performance.
Structural & Cosmetic Replacement Parts
Not every replacement part affects mixer performance. Some components are replaced to restore appearance, improve positioning, or repair external damage.
Includes bowl support arms, locating pins, and related positioning components used mainly on bowl-lift mixers.
Motor covers, trim bands, and panels are commonly replaced during restoration projects.
Retainer pins, screws, and other small components can restore proper assembly after repairs.
Some parts are related to positioning, appearance, or restoration.
Examples include:
- Bowl support arms
- Bowl locating pins
- Retainer pins
- Trim bands
- Housing panels
These parts are commonly replaced during restoration projects or when repairing older mixers.
Stand Mixer Problems and the Replacement Parts They Usually Need
Before buying any stand mixer replacement parts, diagnose the actual symptom first. A part name alone is not enough because the same replacement category can exist in multiple versions depending on the mixer model and generation.
Use the symptom as your starting point, then confirm the exact part number before ordering.
Match Your Mixer Problem to the Right Replacement Part
Start with the symptom your mixer is showing, then identify the component most likely responsible before ordering a replacement.
Possible Cause
Worn worm gear or damaged planetary components.
Possible Cause
Electrical problems involving wiring, control components, or motor brushes.
Possible Cause
Worn carbon brushes or problems affecting motor performance.
Possible Cause
Damaged sealing components allowing lubricant to escape.
Possible Cause
Compatibility or adjustment problems rather than a broken part.
Mixer Makes a Grinding or Clicking Noise
A grinding noise is one of the most common reasons owners search for stand mixer repair parts.
Possible causes include:
- Worn worm gear
- Damaged worm follower gear
- Planetary gear assembly damage
- Old or insufficient gear grease
Common replacement solution:
Worm gear replacement kit
A failed worm gear is often designed to protect the motor by breaking under excessive resistance. Replacing the gear and refreshing the grease can restore normal operation when the motor itself is still working correctly.
Stand Mixer Turns On But Attachment Does Not Spin
When the motor runs but the beater, hook, or paddle does not move, the problem is usually somewhere in the drive system.
Possible causes:
- Broken worm gear
- Damaged planetary assembly
- Worn drive components
Before replacing electrical parts, confirm that the motor is actually transferring power through the gear system.
Stand Mixer Will Not Turn On
A mixer that does not start can have several possible causes.
Check these components:
- Power cord
- Electrical connections
- Speed control plate
- Electronic control board
- Motor brushes
A complete motor failure is possible, but it is often not the first component to replace.
Stand Mixer Loses Speed or Stops Under Load
If your mixer starts normally but slows down while mixing dough or heavy ingredients, the problem may be related to power delivery.
Common causes:
- Worn carbon motor brushes
- Faulty speed control components
- Motor-related wear
Common replacement solution:
Carbon motor brush replacement
Because brushes wear gradually, replacing them can restore motor performance on some models without replacing the entire motor.
Stand Mixer Leaks Grease From the Beater Shaft
Grease around the attachment hub is usually related to sealing problems rather than a complete gear failure.
Possible causes:
- Worn planetary shaft O-ring
- Damaged transmission gasket
- Excessive internal grease breakdown
Common replacement solution:
Replace the worn seal component and inspect the internal grease condition.
Mixer Attachment Does Not Fit Correctly
Not every attachment problem requires a replacement part.
Before buying a new component, check:
- Attachment compatibility
- Mixer model number
- Bowl size
- Attachment adjustment height
A beater that sits too high or too low may only need adjustment rather than replacement.
Quick Reference: Stand Mixer Replacement Parts by Symptom
| Mixer Problem | Possible Replacement Part |
|---|---|
| Grinding or unusual noise | Worm gear, planetary gear assembly |
| Mixer runs but attachment does not move | Drive gear components, planetary assembly |
| Mixer will not start | Power cord, control board, wiring |
| Mixer loses speed | Carbon motor brushes, speed control components |
| Grease leaking from shaft | O-ring, gasket, grease replacement |
| Attachment does not sit correctly | Compatibility check or attachment adjustment |
Before Ordering Any Stand Mixer Replacement Part
Avoid choosing parts based only on appearance.
Many replacement parts look nearly identical but differ in:
- Model compatibility
- Shaft design
- Electrical specifications
- Mounting points
- Mixer generation
Always verify:
- Mixer brand and model number
- Exact replacement part number
- Manufacturer compatibility information
- Whether the part is OEM or a confirmed substitute
How to Find the Correct Stand Mixer Replacement Part by Model Number
Your mixer model number is the most important piece of information when searching for replacement parts.
A part described as a “worm gear,” “control board,” or “motor brush” is not automatically universal. Different mixer generations may use different versions of the same component.
Where to Find Your Stand Mixer Model Number
Depending on the mixer design, the model number may be located:
- Underneath the mixer base
- On a label near the motor housing
- Behind or beneath the speed control area
- Inside the product documentation
Why Model Numbers Matter for Replacement Parts
Ordering by model number helps you avoid:
- Incorrect gear sizes
- Wrong electrical components
- Incompatible seals
- Parts designed for newer or older generations
For KitchenAid mixers especially, similar model families can still use different internal components.
Always match the replacement part to your exact model instead of relying only on the mixer series name.
Find your stand mixer model number to your KitchenAid model number guide.
Genuine vs. Third-Party Stand Mixer Parts: What You Need to Know
Not all stand mixer replacement parts are equal. While many aftermarket parts can work correctly, the level of risk depends heavily on the type of component you are replacing.
A replacement gasket and a replacement control board do not carry the same level of importance. Mechanical parts with tight tolerances and electrical components require more careful selection than simple sealing components.
Before purchasing any replacement, understand the difference between genuine, OEM, manufacturer-approved, and aftermarket parts.
OEM vs Aftermarket Stand Mixer Parts: What You Need to Know
Not all stand mixer replacement parts are equal. Understanding the difference between genuine OEM parts and aftermarket alternatives helps you choose the right replacement based on the type of repair you are performing.
OEM vs Aftermarket Comparison
Compare compatibility, cost, availability, and the type of repair each option suits best.
Compatibility
Designed around original manufacturer specifications and usually matched to exact mixer models.
Quality depends on the manufacturer and the accuracy of compatibility information.
Price
Usually have a higher purchase price because they follow original specifications.
Often provide a lower-cost alternative for selected repairs.
Availability
Availability may depend on the age and popularity of your mixer model.
Often easier to find, especially for older mixer models.
Best Used For
- Worm gears
- Control boards
- Electrical components
- Gaskets
- Seals
- Some cosmetic parts
Choose OEM When:
- Replacing critical internal gears
- Working on electrical components
- The repair requires precise tolerances
Aftermarket May Work When:
- Replacing simple seals or gaskets
- Restoring cosmetic components
- The seller provides clear compatibility information
What Are OEM Stand Mixer Parts?
OEM stands for Original Equipment Manufacturer.
OEM replacement parts are produced according to the original manufacturer’s specifications and are designed to match the original component.
Common examples include:
- Worm gears
- Planetary assemblies
- Control boards
- Motor components
- Replacement seals
Benefits of OEM parts:
- Designed for specific mixer models
- Better fit consistency
- Manufacturer specifications are easier to verify
- Lower chance of compatibility problems
Are Aftermarket Stand Mixer Parts Safe to Use?
Aftermarket stand mixer parts can be a suitable option, but quality varies between manufacturers.
The suitability depends on the type of part.
Lower-Risk Aftermarket Parts
These parts usually have fewer performance concerns when correctly sized:
- Gaskets
- O-rings
- Seals
- Some cosmetic components
For these parts, accurate measurements and compatibility are usually the most important factors.
Higher-Risk Aftermarket Parts
Extra care is needed with:
- Worm gears
- Planetary assemblies
- Motor brushes
- Control boards
- Electrical components
These parts depend on precise:
- Dimensions
- Material quality
- Electrical specifications
- Manufacturing tolerances
A part that appears compatible may still create performance problems if it does not match the original specifications.
How to Check If a Replacement Part Is Genuine or Reliable
Before purchasing a replacement part, check the following:
1. Confirm the Exact Model Compatibility
Avoid searching only for:
“Kitchen mixer worm gear”
Instead search using:
“Kitchen mixer model number replacement worm gear”
Model-specific searches reduce the chance of ordering an incorrect component.
2. Check the Part Number
A reliable listing should provide:
- Original part number
- Compatible model numbers
- Manufacturer references
- Replacement details
A vague listing with only a general part name requires more caution.
3. Compare the Old and New Part
Before installation, compare:
- Shape
- Mounting points
- Size
- Connection points
A visual comparison can help identify obvious mismatches.
However, appearance alone should not be the only compatibility check.
4. Consider the Type of Repair
The importance of part quality depends on what you are replacing.
For example:
| Part Type | Importance of Exact Match |
|---|---|
| Gasket or seal | Medium |
| Gear components | High |
| Motor brushes | High |
| Control board | Very High |
| Cosmetic parts | Low |
Quick Comparison
| Feature | OEM Parts | Aftermarket Parts |
|---|---|---|
| Original specifications | Usually confirmed | Depends on manufacturer |
| Model compatibility | Easier to verify | Requires more checking |
| Price | Often higher | Often lower |
| Availability | May vary | Usually widely available |
| Best for | Critical mechanical/electrical repairs | Budget-conscious replacements |
Where to Buy Stand Mixer Replacement Parts
Once you know the exact failed component and model number, there are several places to source replacement parts.
The two most common options are:
Manufacturer Parts Sources
Manufacturer-supported parts suppliers are useful when you need:
- Original replacement parts
- Verified compatibility
- Model-specific searching
These sources are usually preferred for:
- Gear assemblies
- Electrical components
- Internal mechanical parts
Established Appliance Parts Retailers
Specialized appliance parts retailers often provide:
- OEM parts
- Manufacturer-approved replacements
- Compatibility guides
- Repair documentation
They can be useful when an original component is discontinued or difficult to locate.
Stand Mixer Replacement Parts Checklist: What to Buy Before Starting a Repair
Before ordering stand mixer replacement parts, it helps to prepare the correct information and tools first. Many repair mistakes happen because owners purchase a part before confirming the actual problem or checking compatibility.
A simple checklist can prevent buying the wrong component and save time during the repair process.
Information You Need Before Ordering Replacement Parts
Before searching for a replacement, collect these details:
1. Mixer Brand and Model Number
The model number is the most important detail.
It helps you confirm:
- Compatible replacement parts
- Correct generation
- Proper electrical specifications
- Matching mechanical components
A part that fits one stand mixer model may not fit another, even if both mixers look similar.
2. The Exact Symptom
Do not start with the part name.
Start with what the mixer is doing.
Examples:
- Grinding noise → possible gear problem
- Grease leak → possible seal or gasket issue
- No power → possible electrical problem
- Weak performance → possible brushes or control issue
Correct diagnosis reduces unnecessary purchases.
3. Existing Part Information
If possible, compare the failed part before ordering.
Record:
- Part number
- Measurements
- Shape
- Connection points
- Manufacturer markings
This is especially important for:
- Gears
- Control boards
- Motor components
Stand Mixer Repair Parts Checklist
Use this checklist before purchasing:
| Checklist Item | Why It Matters |
|---|---|
| Exact mixer model number | Confirms compatibility |
| Current symptom | Helps identify the correct part |
| Original part number | Reduces ordering mistakes |
| Replacement source | Helps verify quality |
| Installation requirements | Determines repair difficulty |
Common Stand Mixer Repair Supplies to Keep Available
Some repairs require additional supplies beyond the replacement component.
Food-Grade Gear Grease
Recommended when replacing internal gears.
Used for:
- Reducing friction
- Protecting moving components
- Extending gear life
Cleaning Materials
Before installing a new part, clean away:
- Old grease
- Metal particles
- Dust buildup
A clean repair area helps prevent contamination of new components.
Basic Hand Tools
Depending on the repair, you may need:
- Screwdrivers
- Wrenches
- Pliers
- Small containers for screws
- Cleaning cloths
Always check the repair requirements for your specific model before opening the mixer.
Should You Repair or Replace Your Stand Mixer?
Not every damaged mixer requires replacement.
A repair is often worth considering when the problem involves:
- Worm gears
- Motor brushes
- Seals
- Gaskets
- Minor mechanical components
Replacement may make more sense when:
- The motor has major damage
- Multiple expensive components have failed
- Repair costs approach the price of a newer mixer
The condition, age, and availability of replacement parts should all be considered before deciding.
Final Repair Tips: How to Make Stand Mixer Replacement Parts Last Longer
Replacing a damaged component is only the first step. Proper installation, maintenance, and usage habits can help your new stand mixer replacement parts last longer and reduce the chance of another failure.
Many repeat failures happen because the original cause of the problem was not corrected. For example, replacing a worn gear without checking lubrication or excessive mixing loads can shorten the life of the new component.
1. Replace Gear Grease When Servicing Internal Parts
If you replace internal drive components such as:
- Worm gears
- Planetary assemblies
- Transmission components
inspect the existing grease condition.
Old grease may become:
- Thick and separated
- Contaminated with metal particles
- Less effective at reducing friction
Applying the correct food-grade mixer grease during a gear repair helps protect moving parts and improves long-term performance.
2. Avoid Overloading Your Stand Mixer
Heavy mixing tasks place additional stress on internal components.
Common causes of excessive strain include:
- Mixing dough beyond the recommended capacity
- Running the mixer continuously for extended periods
- Using incorrect speed settings for heavy mixtures
Following the manufacturer’s usage recommendations can reduce stress on:
- Gears
- Motor brushes
- Drive assemblies
3. Check Attachments Before Operating the Mixer
A compatibility problem can create unnecessary stress.
Before using attachments:
Confirm:
- The attachment fits your mixer model
- The attachment is properly installed
- The bowl clearance is correctly adjusted
A poorly fitted attachment can affect mixing performance and place extra pressure on internal parts.
4. Listen for Early Warning Signs
Small changes in mixer performance can indicate developing problems.
Pay attention to:
- New grinding sounds
- Slower operation
- Burning smells
- Excessive vibration
- Grease appearing around the attachment shaft
Addressing these issues early may prevent damage to more expensive components.
5. Keep Replacement Records
After completing a repair, keep a record of:
- Replacement part used
- Part number
- Repair date
- Mixer model
This makes future repairs easier and helps avoid purchasing the same incorrect component again.
Stand Mixer Maintenance Checklist
For long-term performance:
✓ Confirm model compatibility before ordering parts
✓ Use correct replacement components
✓ Replace damaged seals before grease leaks worsen
✓ Refresh grease during major gear repairs
✓ Avoid exceeding mixer capacity
✓ Monitor unusual sounds or performance changes
Frequently Asked Questions
What are the most commonly replaced stand mixer parts?
The most commonly replaced stand mixer parts include worm gears, planetary assemblies, carbon motor brushes, control boards, seals, gaskets, and gear grease. These components experience wear through regular use or can fail after heavy mixing tasks.
How do I know which replacement part my stand mixer needs?
Start by identifying the symptom your mixer is experiencing. Grinding noises often point to gear problems, weak performance may indicate worn motor brushes, and grease leaks usually involve seals or gaskets. Always confirm the exact model number before ordering.
Are stand mixer replacement parts interchangeable?
No. Stand mixer replacement parts are usually model-specific. Two mixers may look similar but use different gears, electrical components, or attachment connections. Always verify compatibility using the exact model number.
Are OEM stand mixer parts better than aftermarket parts?
OEM parts are designed according to the original manufacturer’s specifications and are generally easier to verify for compatibility. Aftermarket parts can work correctly, but quality varies depending on the manufacturer and the type of component being replaced.
Can I replace stand mixer parts myself?
Some repairs, such as replacing seals, gaskets, or brushes, may be manageable for experienced DIY users. Repairs involving electrical components, motors, or internal gear assemblies require more care because incorrect installation can damage the mixer or create safety risks.
Where can I buy stand mixer replacement parts?
Replacement parts can be purchased through manufacturer-supported suppliers, appliance parts retailers, and online marketplaces. Always confirm the seller provides compatible model information before purchasing.
Can replacing a stand mixer part be cheaper than buying a new mixer?
In many cases, replacing a single worn component can cost significantly less than replacing the entire mixer. The decision depends on the age of the mixer, repair complexity, replacement part cost, and overall condition
Final Thoughts: Choosing the Right Stand Mixer Replacement Parts
Most stand mixer failures do not mean the machine needs to be replaced. Many common problems can be solved by identifying the correct stand mixer replacement parts, including gears, motor brushes, seals, gaskets, and electrical components.
The most important step is diagnosis. Start with the symptom, confirm your exact model number, and choose a replacement part designed for that specific mixer.
Whether you are replacing a worn worm gear, restoring motor performance with new brushes, fixing a grease leak, or replacing an electrical component, the right part can extend the useful life of your stand mixer.
A careful repair approach — using compatible parts, proper maintenance, and reliable sourcing — can help your mixer continue performing for years.
Last Updated on September 18, 2026 by Susan Joy